November 2025
Quick facts
- The SmartShelf communicates with Symphony and IMMS to check items in and route them.
- Staff do not need to check the items in again, unless an item has a hold to be picked up at the checkin location (the SmartShelf does not print hold slips).
- Staff do need to remove the items from the shelves and route them appropriately.
- The frequency with which this is done will need to be determined at the branch level.
- Use the Full inventory menu (available under the Administration menu) to see which items need to be put into transit crates and which will stay at the branch.
- It’s OK for patrons to browse the SmartShelf and check out returned items.
- If you have a question or need to report a non-urgent problem, email the AMH Support Team at amh@multco.us.
- If you have an urgent problem, call the AMH Support Team at 971-990-8291.
Procedures
- Checking items in
- Accessing the Administration interface
- Seeing where checked-in items are going
- Error messages and troubleshooting
- About the equipment
Checking items in
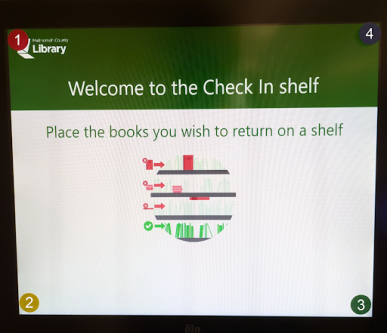
- Place item/s on the Smartshelf, between any two dividers.
- More than one item may be placed at a time.
- Items must be placed vertically. The design of the shelves is intended to make this clear, but particularly small items (such as Beatrix Potter mini-editions) may need to be adjusted.
- It doesn’t matter what direction the spine is facing, as long as the item is vertical.
- Each item will appear on the screen as it is checked in.
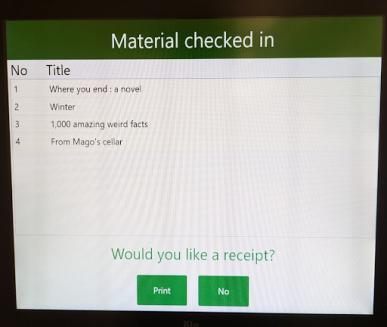
- Tap a receipt option on the monitor.
- The “Print” button will generate a printed check-in receipt. All items showing on the screen will show on the receipt, no matter how many patron accounts they were checked in from.
- If the patron does not make a selection, the home screen will return after a few minutes.
- Walk away.
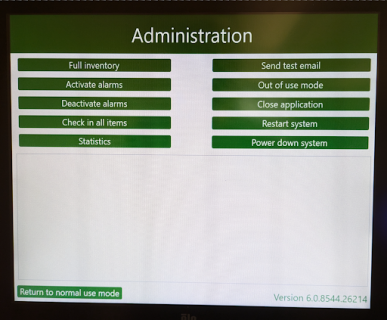
Accessing the Administration interface
1. Tap the corners of the monitor in this order:
- Upper left
- Lower left
- Lower right
- Upper right
- Don’t pause too long between taps.
- It may take a few tries to get your tap placement exactly right.
2. Once you’ve tapped correctly, the Administration menu will appear. The primary option you will use is Full Inventory.
-
Full inventory (ignore the warning screen): Shows routing information for all checked-in items.
- A summary of all items currently on the SmartShelf. Each item has two green dots to the left of it. Some green dots will also have white checkmarks in them.
- A checkmark in the Transfer column dot: These items (holds and returns) can go directly into crates.
- A checkmark in the Hold column dot:
- If there is also a checkmark in the Transfer column dot, it can go directly into a crate.
- If there isn't also a checkmark in the Transfer column dot, it is a hold to be picked up at your branch. Use Symphony to check it in and print a hold slip.
-
No white checkmark in either dot: These items will be shelved at your branch.
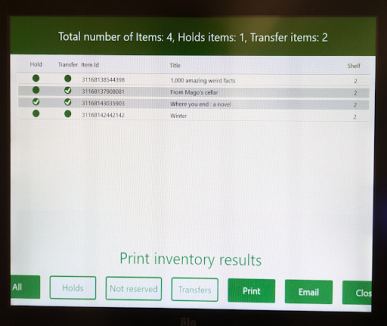
- All (default view): Displays all items currently on the shelves.
- If there aren't very many items, you can just use this screen to tell you where they will be routed.
- If there are a lot of items, you may want to sort them using the buttons at the bottom of the screen.
- Transfers button: Displays only the items that are in transit (may or may not be on hold)
- Everything on this list will go into a crate, and everything else will stay at the branch.
- Holds button: Displays only the items currently on the shelf that have holds on them. Look under Transfer to see whether they will stay at the branch.
- Not reserved button: Displays only the items that are not on hold. Look under Transfer to see whether they will stay at the branch.
- Print button: Prints out a list of the items showing on the current menu screen. The number before the barcode is the shelf that the item is on.
- Email button: Emails a list of the items showing on the current menu screen to all contacts.
- The screen doesn’t show whether the email was sent. Please check to see if you received an email before tapping the button again.
- Close button: Returns to the main Administration screen
Note: The admin screens do not time out - you have to use this button to get back to the main Check In screen.
- A summary of all items currently on the SmartShelf. Each item has two green dots to the left of it. Some green dots will also have white checkmarks in them.
-
Additional Administration menu options:
- Activate alarms (Do not use)
- Deactivate alarms (Do not use)
- Check in all items: Re-checks in all items currently on the shelves
- Statistics: Prints a list of the last week’s activity
- Send test email: Sends a test email to all contacts
- Out of use mode: Sets the SmartShelf to Out of Order
- Close application: Closes the SmartShelf program on the computer
- Tap the LibShelf icon on the screen to restart the program.
- Restart system: Restarts the computer
- Power down system: Turns the computer off
- Return to normal use mode: Returns to the main Check In screen
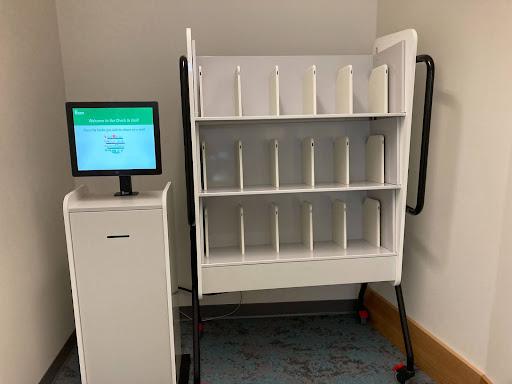
About the equipment
- The SmartShelf is composed of four primary parts:
- A set of three shelves on a wheeled frame.
- Each shelf has six vertical RFID pads. The pads check in items placed between them.
- The wheels of the frame should always be locked when the branch is open.
- A touchscreen monitor that serves as a patron/staff interface.
- A computer that runs the SmartShelf.
- The computer is in the locked cabinet under the monitor.
- The key to the cabinet lives in the main key box in the workroom.
- The computer is in the locked cabinet under the monitor.
- A receipt printer
- The receipt printer is also in the locked cabinet under the monitor.
- Receipts come out of the slot in the front of the cabinet. Sometimes they don’t stick out very far.
- Patrons have the option of checkin receipts printed on receipt paper!
- There is no external indication that the receipt paper has run out.
- A set of three shelves on a wheeled frame.
Error messages and troubleshooting
- If the SmartShelf isn't working:
- Close & restart the program.
- If restarting the program doesn't fix the problem, restart the computer (manually if necessary).
- If restarting the program doesn't fix the problem, call the AMH Support Team at 971-990-8291.
- If checkin receipts aren't printing:
- Make sure there is paper in the printer (the SmartShelf won't tell you if the paper has run out).
- Make sure the printer paper isn't jammed.
- If you get an email with the subject line: "Libshelf: Critical error occurred":
- The SmartShelf has lost connection to the network.
- If the email is sent during open hours, call the IT Help Desk at 503-988-5100.
- If the email is sent during closed hours, don’t worry about it.
- The SmartShelf has lost connection to the network.
- If you have a question or need to report any problem except a critical error email, contact the AMH Support Team:
- Urgent - call 971-990-8291
- Non-urgent - email amh@multco.us
Notes
- It’s OK for patrons to check out items that other patrons have returned in the SmartShelf.
- The SmartShelf can be set to email hourly inventories of everything that is on the shelves (during open hours). The branch administrator will decide whether to activate this.
- The email will go to all contacts at your branch.
- The subject line will start with LibShelf.
- If there are no items on the shelves, no email will be sent.